Actions
In the Actions tab, you can set animations for the components in the screen of your app and determine how the user invokes different effects and triggers different actions while interacting with the app.
Read below to learn more about how to set events, actions and animations for the components of your app.
Events & Actions
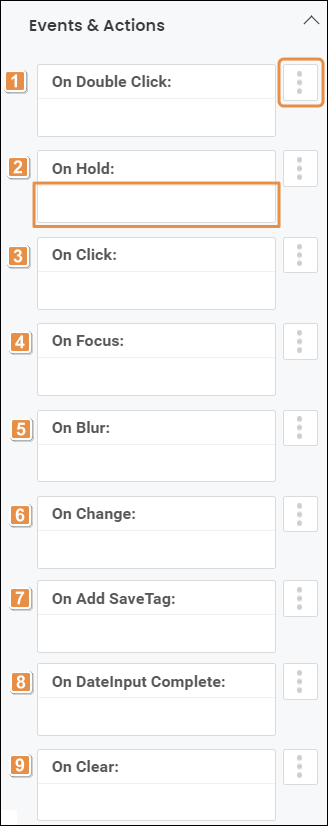
In this section, you can set events or actions that will be triggered upon carrying out a certain action - for example, clicking or double clicking on a component. Within the actions available, you can link a component in the screen to a screen-type interface of any module previously linked to the app in the Dependencies section of the App Settings. To learn more about how to instance component-type modules, read Instancing a Screen-type Module.
Refer to the annotated image below to learn more about the actions that trigger events or other actions.
Important
The number of actions available will depend on the component selected. Certain actions may not be implemented for specific components.

On Double Click. Double-clicking or tapping the component.
On Hold. Clicking on the component and maintaining it clicked for more than one second.
On Click. Clicking or tapping the component.
On Focus. Focusing on the component. For example, tapping on a form to begin typing.
On Blur. Losing focus on that same component.
On Change. Changing the component's value.
On Add SaveTag. Adding an element or a tag to a component. It is applicable to list components.
On DateInput Complete. Completing a date in a date field by typing the date or by selecting it from a calendar.
On Clear. Deleting the last character of the component's value.
In all cases, to set the event or action to be triggered, click on the vertical three-dot icon. The Create new link window opens. Click on the down arrow and select one of the link types available in the drop-down menu: View, SW States, Process, Lambda, Pop Up, Toggle, Event, Link, Mail, Module Screen or Interface Message. A new drop-down menu appears. Click on the down arrow and select the action or event within the selected type. Then, complete the parameters applicable to the option selected.
Once you configure the required parameters, click Accept and go back to the Visual Builder. You can also type the action to be triggered in the field below each action (see image above).
Animations
In this section, you can set different animations or effects for the selected component. Animations allow you to change specific attributes of a component (Alpha, Scale, Rotation, Position) within a screen by configuring a set of conditions and determine when the animations will be triggered (for example: when starting the screen or when the user clicks on a particular component). Each component may contain one type of animation, several types of animations simultaneously, or a series of steps where each type occurs at a certain time.
Refer to the chart below to learn more about the component's attributes on which you can set animations. The values in these attributes will be considered as the initial values in the Animation Editor.
Alpha | Component’s transparency or opacity. Enter the value to set the initial opacity of the component before the animation is executed. The value can range from 0 to 1, considering it as the value that grants the highest level of transparency. |
Scale | Component's dimension. Enter the value to set the initial scale of the component before the animation is executed. By default, the scale value is 1, which equals the component’s original size. The value can be any number starting on 1. |
Rotation | Component's rotation angle. Enter the value to set the component's initial angle of rotation before the animation is executed. The value can go from 0 to 90, and it is expressed in degrees. |
Position | Component's position. This attribute is configured in the Design tab of the Attributes Editor. |
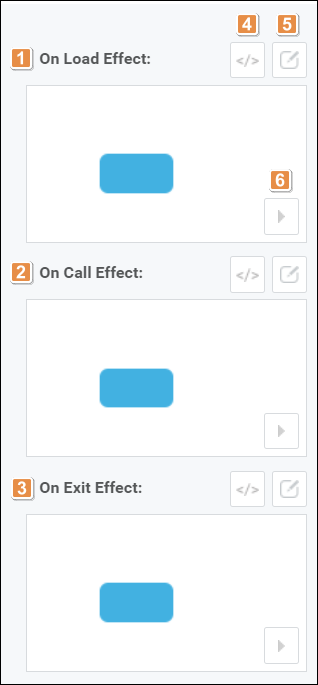
Then, you can configure the effects or animations that will be executed on the attributes previously configured. Refer to the annotated image below to learn more.

On Load Effect. The animation created in this instance is executed immediately after the screen loads.
On Call Effect. The animation created in this instance is executed upon invoking it through a message.
On Exit Effect. This animation is played before closing a screen. This effect has not been implemented yet.
Coding. Click on </> (coding icon) and then click on the text field to start writing the code to set the animation for any of the effects.
Edit. Click to open the Animation Editor in the desired effect and set the animation details and steps.
Play animation. Click to see how the component will behave when the animation is executed. The animation displayed in this preview pane is the same animation you can see in the Animation Editor.
Animation Editor
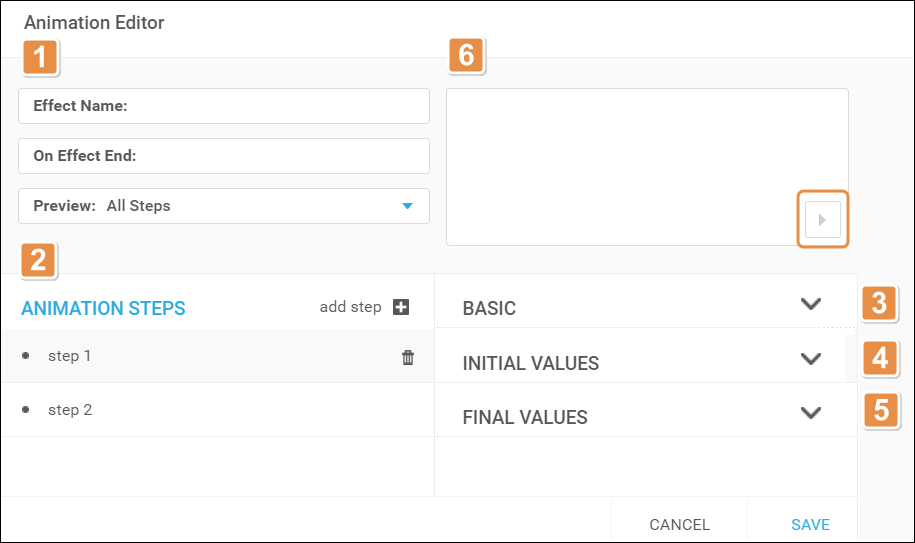
Once the Animation Editor opens, you can set the basic details as well as to configure the steps and respective parameters for the effect selected. Refer to the chart below to learn more about the steps to be configured.
 |
Basic details. Refer to the chart below to learn more about the animation basic details to be configured.
Effect Name
Enter a name for the selected effect.
On Effect End
Action to be executed after the animation ends. This feature has not been implemented yet.
Preview
Animation preview. Click on the down arrow and select the number of animation steps you want to see in the preview panel: All Steps or Selected Step. The All Steps option appears by default. If you choose Selected Step, you must click on the desired step and the animation will appear in the Preview panel.
Note
The Preview pane only shows the configured steps but does not display the whole screen and its components. To preview the whole screen, you need to generate and publish the app.
Animation Steps. Click add step + to add a new step to the animation. The steps number appear in order of creation but you can change the order by double clicking on the desired step and dragging it up or down in the steps list. To delete a step, click on Delete (trash bin icon). Click on a step so the Basic, Initial Values and Final values sections appear for configuration.
Basic section. Refer to the chart below to learn more about the parameters to be completed.
Name
Step name. Enter a name. It will automatically change in the steps list.
Delay
Time (in seconds) that elapses before the animation begins. Enter the desired number or enter 0 for the animation to begin immediately. By default, the value is 0.
Duration
Total duration (in seconds) of the animation. Enter the desired number. By default, the value is 0.
Repeat
Enter a number to determine how many times the animation steps repeats. By default, the value is 0. This attribute has not been implemented yet.
Curve
Curve to be used in the animation. The options available in the drop-down menu are: linear, easeIn, easeOut, easeInOut. This attribute has not been implemented yet.
Damping Ratio
Damping attribute. Values can range between 0 and 1. Enter a value closer to 0 to increase the oscillation of the animation or enter 1 to reduce the swinging effect of the animation without oscillation. This parameter is not mandatory.
Position Type
Final position of the component with regard to its initial position. Select one of the positions available: Absolute or Relative. Choose Absolute so that the component changes its position considering the final values in the Abs Left and Abs Top parameters. Choose Relative so that the component changes its position by adding or subtracting the values in the Abs Left and Abs Top parameters to or from the initial position values. By default, the value is Absolute.
Initial Values section. Values set for the component's attributes at the initial stage of the animation. The parameters in this section include: Abs Left, Abs Top, Scale, Alpha, Rotation.
Note
Initial Values are automatically configured using the values previously set in the Animation section of the Actions tab and in the basic details section of the Design tab of the selected component. Therefore, they are grayed-out and cannot be modified.
Final Values section. In this section, you can set the values that the component's attributes adopt at the final stage of the animation. Refer to the chart below to learn more about the parameters to be completed.
Abs Left
Final position of the component in the X axis after the animation is executed. Enter a value using numbers. Then, click on the down arrow and select one of the units of measurement available in the drop-down menu.
Abs Top
Final position of the component in the Y axis after the animation is executed. Enter a value using numbers. Then, click on the down arrow and select one of the units of measurement available in the drop-down menu.
Scale
Component's dimension. Enter the value to set the final scale of the component after the animation is executed. By default, the scale value is 1, which equals the component’s original size. The value can be any number starting on 1.
Alpha
Component’s transparency or opacity. Enter the value to set the final level of opacity of the component after the animation is executed. The value can range from 0 to 1, considering it as the value that grants the highest level of transparency.
Rotation
Component's rotation. Enter the value to set the component's final angle of rotation after the animation is executed. The value can go from 0 to 90, and it is expressed in degrees.
Play animation. Click to see how the component will behave when the animation is executed.
Once you complete all the parameters, click Save to save changes or click Cancel and go back to the Visual Builder.